
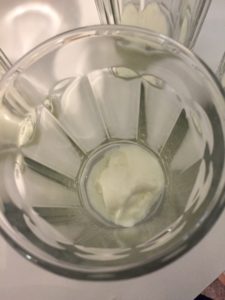
No more yogurt! I’ve got to make some today.
It’s not complicated. Making yogurt sounds like a lot of work but once you do this often enough, you would hone it into a science, or art. I’ve never liked store bought yogurt but I like mine.
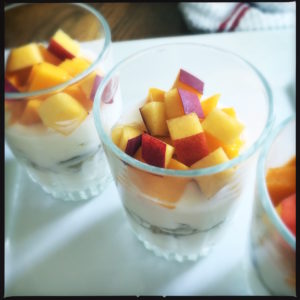
Homemade yogurt is so worth it. It has no preservative and if you prefer it sweet, add granola or fruit, or mix with maple syrup. You can put it under or over fruit. It’s delicious. My Granola recipe is here.
And if you ever need to make a dessert, salad dressing, marinade or curry, you have yogurt in your fridge. I make a half gallon each time–my yogurt costs me less than $2.50 for two quarts! If you make it continuously you just culture it from your existing batch of yogurt. One batch lasts me for three or four weeks. It keeps well!
 People make yogurt in so many ways. I’ve done it scientifically–thermometers, exacting timing, etc. But I’ve also adopted the art passed from generation to generation; many cultures make yogurt without the modern conveniences of yogurt makers, and precise temps. That is to say I’ve tried many different ways.
My first attempt was in Singapore 40 years ago. In its hot weather, the milk is not incubated the way it’s done in colder countries. After adding the starter we just leave it aside and let the equatorial weather do the job.
There were three main elements in making homemade yogurt that I wrestled with. Temperature, storage and incubation. I googled and read all the different ways people work around these. Each person had their own very specific instructions.
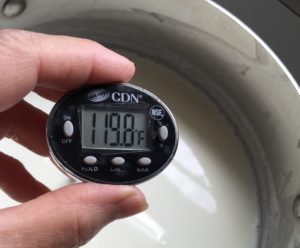
Anne Marie, my friend, taught me her way when she visited from Hong Kong. She learned it from a Ukraine woman and advised me to do everything following this friend’s tradition. People who have done it for years know the temperature by sight and touch. Boil it until the milk is moving but not at a rolling boil, Anne Marie said. She tested when to stop boiling by dipping her finger into the hot milk. Online I read it’s anything between 180-200 degrees Fahrenheit.
She let the milk cool and tested that by placing her palm to the pot. It’s warm to the touch and shouldn’t burn you, she said. The various online advice set it between 90-120 degrees Fahrenheit. I found the touch-and-feel methods really hard to gauge. It’s as easy as a new mother figuring out how warm to make a baby bath without scorching junior. I never figured it out.
After adding one heaped tablespoon of store-bought, plain yogurt into the pot, she said: “Be careful when stirring in the culture not to be too vigorous.” We incubated it by wrapping my pot snugly in blankets. She said she covers hers under a pile of blanket and just leaves it on the dinner table. Hmmm, I didn’t want a mountain of blankets on my dinner table.
Incubating it for about four hours the first time, the yogurt was a tad watery. We tried the second time for six hours and it was fine.
We looked for plain, regular yogurt and wasn’t sure if Greek yogurt would work. But we couldn’t find the former and Greek yogurt, two percent, work splendidly. We also used whole milk because it’s supposedly creamier. That was fine with me. Creamy is good.
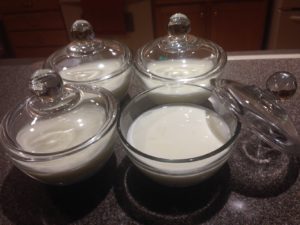
Now storage. We had looked for the right size pan to cook the milk in as well as keep the yogurt chilled. You don’t have to mess with washing too many pots. True enough. But as I dished out the yogurt towards the end of the batch, the sight of all those scooped up holes filled with whey turned me off. There has got to be a more attractive way.
I thought briefly about buying a yogurt maker but don’t like gadgets. Then gym chum Prasanthi came to the rescue when she brought yogurt for one of our breakfast parties. The quality of her yogurt is excellent so she must know what she’s doing. She has yogurt in the fridge all the time, she said.
I told her I used a thermometer. Just bring it to a boil, she said. If it boils, it’s ok, just cool it down. I trusted her confidence.
Also, her yogurt came in individual serving cups. You mean, I can separate it into smaller jars or canisters? And in plastic? I asked. I read online that if you put them in jars, you have to sterilize everything by boiling them in a huge pot. Really? Prasanthi looked at me oddly, as if I was talking about autoclaving.
Anne Marie had also told me to make sure the spoon I used was very clean. Online, some advised that everything had to be sterilized. Well, it just ain’t so. Just regular clean utensils and jars is good enough, I discovered. I made yogurt in a plastic tub–to give a friend–and it worked just as well.
With incubating, Prasanthi said, put it in the oven and let it stay there overnight. Do you have a gas stove? I queried. I have an electric stove, I said. I don’t think it’s the same because mine doesn’t have a pilot light. I had researched this. With another odd look, she said, then turn the light on. I did, and it worked! Genius! But the next day, the light in my new oven blew. It might have been a coincidence. The GE technician said I can’t leave it on for that long, which I didn’t believe but didn’t want to risk it either. How ridiculous.
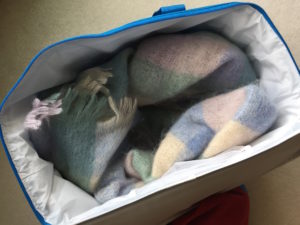
When Prasanthi heard my plight, she said to put it somewhere warm, like on top of the refrigerator. Well, to me that’s equivalent to that messy pile of blankets. I googled incubating yogurt and decided to try using an insulated bag with blankets. That way I can shove and conceal it under a side table.
With what I gleaned from my experienced friends, I adjusted my method to suit my weird ways. I now boil milk (to 200 degrees Fahrenheit) and cool it (to 120 degrees Fahrenheit), testing the temperature with a thermometer because I’m unsure of the finger and palm test.
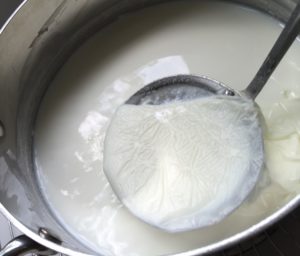
To prevent a film of milk from forming, one site suggested stirring continuously. Milk takes about 8-10 minutes to boil and up to 45 minutes to cool! I use a sieve (no need to sterilize) to scoop up any coagulated pieces in or film on the milk at the end of both processes.
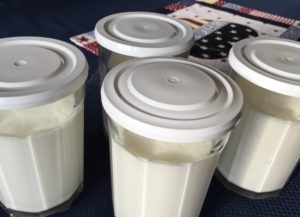
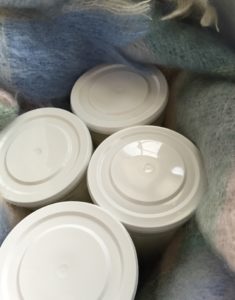
When adding the starter yogurt I put a heaped tablespoon of existing yogurt into each of my glass jars.
I also use a large metal mug to transfer milk into the jars. Sometimes I pour it straight from my pot. If it is a drip-free pot, it won’t create a mess. Add the warm milk and stir. Many sites say to stir gently, but I’ve seen other people do it with a whisk. Just stir it.
My insulated bag is lined with a blanket. Cover those babies snugly and zip up.
About eight to nine hours later, it’s done. You can then transfer the yogurt into the fridge. Usually I make it in the evening and move them to the fridge the next morning. Or make it in the morning and move them in the evening. Chill for at least 2 hours or eat it warm!
It is really easier than this sounds.

Homemade Yogurt
You will need a large pot, a thermometer and a sieve. Also four glass jars or plastic tubs, with lids, that will hold a total of half a gallon of milk. For incubating, line an insulated bag with a blanket.
Makes 2 quarts
Preparation time: 1 hour
Incubation time: 8-9 hours
Chill time: 2 hours
2 quarts whole milk
4 heaped tablespoons plain yogurt
In a pot, heat milk until it reaches between 180-200 degrees Fahrenheit. Stir periodically. This will take from 8-10 minutes.
Remove from heat to cool to 115-120 degrees Fahrenheit, about 40-50 minutes. Remove film and coagulated pieces from milk and discard.
Towards the end of the cooling period of the milk, place one heaped tablespoon of yogurt into each jar. When milk reaches cooled temperature, pour milk into each jar, and stir the yogurt to mix with milk. Two or three stirs is enough. Cover jars with lid. Transfer to insulation bag, zip up and set aside for 6-8 hours.
Remove from bag, and chill in refrigerator until ready to use. Serve yogurt with honey or maple syrup, fruit or granola.
 NOTES
NOTES
–You may use regular, or Greek yogurt, whole milk or two percent milk. I tried it with organic milk. It turned out watery and I didn’t try again.
Alternatives:
–Yogurt starters
Buy yogurt starters, available in granules form, from health food stores. The starter granules is mixed in one cup of the cooled milk and then added to the rest of the pot and mixed well. Follow instruction on box for exact proportions. I found this yogurt was creamier by a bit. It had less whey but I thought it was more sour.
–Incubation options
If you have a gas stove, incubate yogurt in stove for 6-8 hours. Then chill.
Or incubate by covering jars or pot with several layers of blankets. Make sure the jars or pot are snugly and securely wrapped so milk doesn’t spill.
I just made my first yogurt, turned out beautiful! East to do and yummy too